
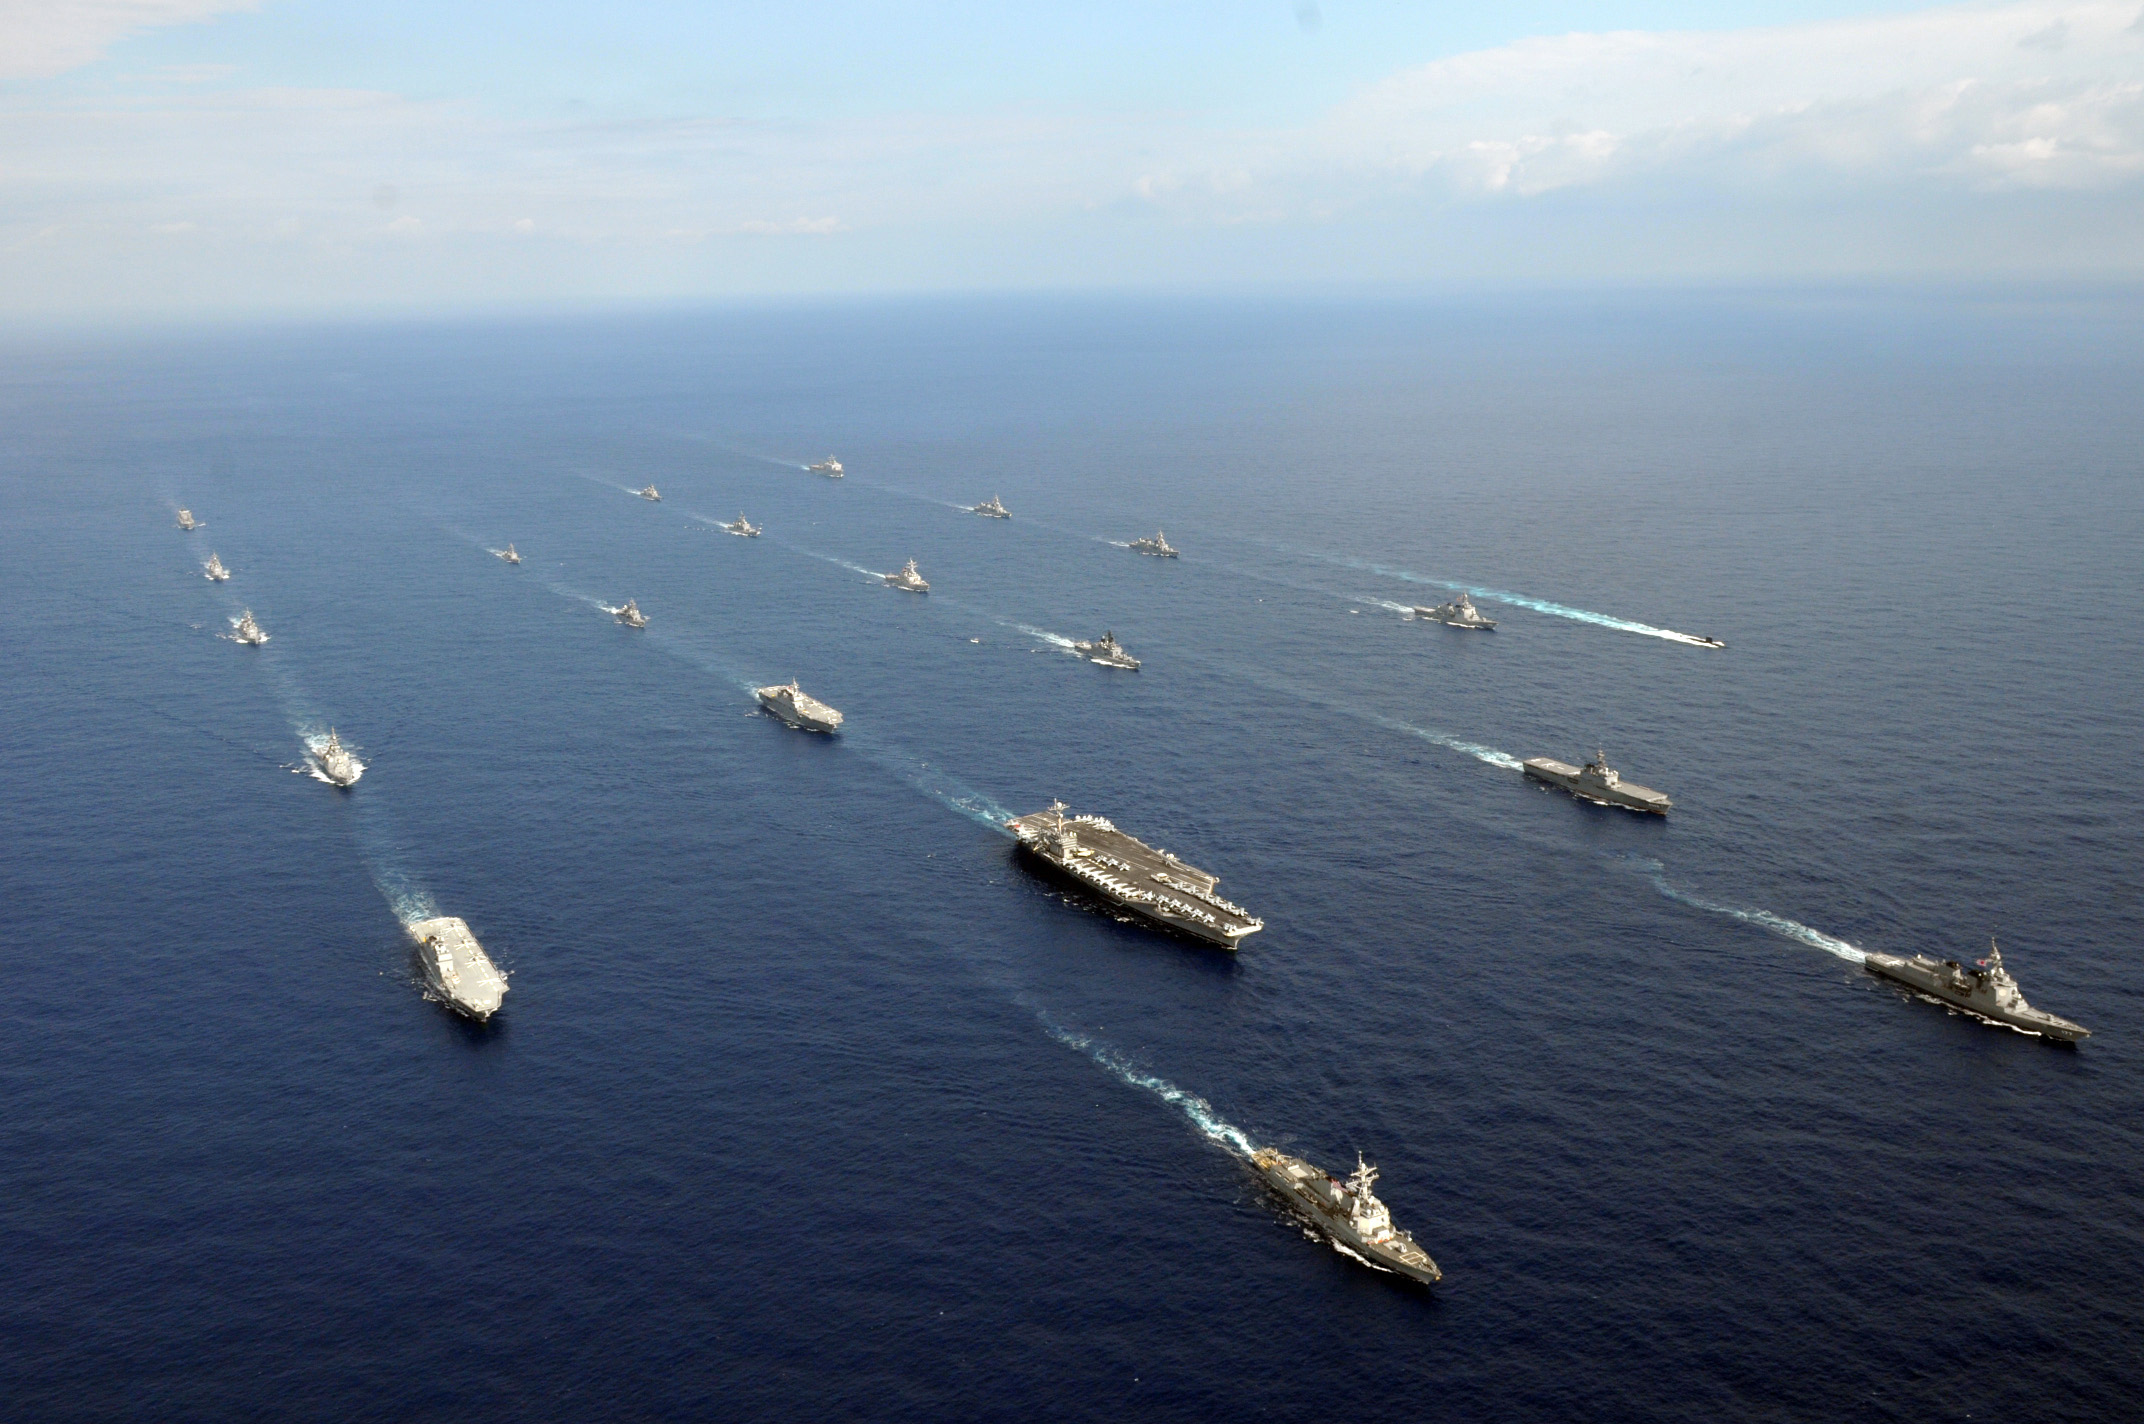
A comprehensive look at the basics of waterborne shipbuilding, covering such topics as: hull design, propulsion techniques, weight distribution, stabilization techniques, and completing a basic ship.
The Most Important Piece of Advice
Left: Megawatt-Class stock vessel of the Lightning Hoods faction.
Above all else, the most critical thing to remember when playing From the Depths is to have fun. A handful of players will scoff at the wackier designs that couldn’t possibly work in real life; another handful will yawn at the designs that attempt to painstakingly replicate reality. The only person who needs to be amazed by the vehicle you’ve created is yourself. Take every technical and aesthetic detail I offer with a pinch of salt, understanding that I learned this game doing things one way, and you could very well do things another with just as much – if not more – success. The main purpose of this guide is to provide building-block techniques and adequate comprehension of ship design.
This guide will, in some places, get far too technical and specific for the average player’s patience. If you feel you would have more fun experimenting and failing until you get it right, I recommend you do so. One of the greatest parts of the game is being horrible at it, but slowly becoming better because of your own efforts. If you are struggling or don’t know where to start, or you are an experienced player looking for a refresher, this is the place for you. Basics will be covered, aesthetic design choices may be suggested, but you should by no means lock yourself in to whatever this guide teaches you.
If you have any questions, please feel free to comment and I’d be more than happy to help out.
Ship Functionality and Requirements
In From the Depths, ships can serve a vaguely large number of functions. All vessels must pass a few observational tests in order to be correctly classified as a ship for the purposes of this guide:
- Waterborne. The ship is destined to rule the waves – not the skies, not the depths of the seas, but the surface of the water. A ship explicitly lacks aerial [plane / airship / thrustercraft / helicopter / airborne installation] and submersible [submarine] capabilities.
- Mobile. The ship has its own fuel, engine, and / or other means of propulsion. If mobility is not met, the ship is a floating fortress [waterborne installation], subject to the whims of the waves and other ships which happen to bump into it.
- Maneuverable. The ship is capable of completing turns, rather than simply moving forward and backward. This can be achieved with the use of a rudder, means of lateral thrust [sideways-facing propellers], or clever paddle maneuvering.
- Capable. The waterborne ship is not only mobile and maneuverable, but is capable in these ways. This means that, when stationary, when at any speed achievable by the ship’s propulsion systems, and when undergoing any extremity of turns made possible by the ship’s maneuver systems, the ship retains its composure on the waves, meaning it doesn’t capsize or otherwise become incapable of passing the first three tests as a result of any of these conditions.
In effect, we can therefore define a ship in From the Depths as a waterborne, mobile, maneuverable vessel, capable of these basic functionalities under any normal conditions.
Fun fact: One of these is a ship, and one of these is not a ship.
While these conditions seem straightforward and obvious, it is often difficult for new and experienced players alike to keep their shitp together when trying to achieve these basic requirements. Designing the cannon that will spearhead your main battlefleet’s flagship is perhaps more glamorous than counterbalancing a back-heavy frigate, but that cannon will have no platform from which to fire if there isn’t a ship in your fleet that can carry it.
Purposes of Ships
DISLCAIMER – This section will not help you become better at building a ship. Why is it in the Beginner’s Guide to Shipbuilding? To many players, this kind of information is both immersive and useful for a deeper understanding, which can provide the motivation to build, but not necessarily the means. Enjoy!
Purposes
In most cases, there is more to a ship than simply meeting its functionality. The purpose of a ship is defined by its intended role – a need that is to be met by the presence of this ship. There are a variety of divisible ship purposes:
- Combat: The most common role that a ship will fill, especially in the earlier stages of a campaign is that of combat. This is both the most basic and the most centric role; a ship whose purpose is that of combat is designed to destroy hostile constructs as well as to defend allied territory from those hostile constructs. Without combat capabilities, a fleet is, for obvious reasons, screwed.
- Command: The flagship of a fleet, typically capable of filling a combat role, serves as the command ship of the fleet. In From the Depths, the distinction between the Flagship and the rest of the fleet is usually ambiguous [and, in reality, it doesn’t make that much of a difference to know which ship is the Flagship], but it is usually characterized as being the ship with the player on it [in a solo campaign], the ship with the most firepower, or the largest ship. The purpose of a flagship varies from fleet to fleet; often times, all that is needed is a big gun. Other times, the flagship will serve unconventional roles to service the fleet.
- Reconnaissance: Serving the purpose of identifying hostile forces in the wake of battle [or perhaps in the hopes to avoid it], reconnaissance ships are broken up into two subcategories: scouting and vanguard. A scout is designed to be as fast and as agile as possible, usually sacrificing armaments, armor, and size for the sake of speed. Scouts often venture far ahead of the main battlegroup, identifying hostile forces before beating a hasty retreat with the information secured. A vanguard serves the same role as a scout, but is more well armored and armed such that it could defend itself [at least for a little while] if it were caught.
- Combat Support: Combat support ships fit into an unconventional combat role, such as providing long-range artillery fire, an obscene amount of anti-air capabilities, missile-interception capabilities [so as to protect less well-protected ships in the fleet], or anti-submarine capabilities. Combat support ships don’t tend to become necessary until later on in a campaign where you are exposed to a variety of highly specialized constructs. In multiplayer, one can imagine the highly specified and lethally efficient designs of other players, where combat support ships fill an important role.
- Utility: In longer operations, often overlooked issues such as fuel, ammunition, and spare parts can become crippling to the fleet. Utility ships mitigate this issue, serving as huge reserve banks of critical supplies. These ships also often carry means to repair other ships in order to speed up the regenerative process. In order to maximize the amount of supplies and equipment a utility ship can carry, it is commonplace to forego armor and armaments. Due to this, utility ships are often placed far back in the fleet, only being called up to do their work when the area is made secure. In some cases, Combat Utility ships [armor and / or armaments now included] are used in the heat of battle to provide emergency repairs and supplies to ships in need.
Imagine the possibilities…
Types and Classes of Ships
DISCLAIMER – This section, like the previous, also offers no technical insight into how to build a ship in From the Depths. However, just like with the previous section, an understanding of this section may offer a great motivation and idea of what you want your ship to be. It also will help you name your ship and identify it in a larger library of ships if you wish to be professional about it.
The type of a ship is a technical remark to a variety of physical characteristics of the ship, including its weight, size, speed, maneuverability, or firepower. Many types of ships exists, as you might imagine, especially throughout the ages of history. Because there are so many unique types, we will offer a few with regards to gunpowder fleets and beyond.
Ship Types and Subtypes
U.S.S. Iowa, an Iowa-Class Battleship
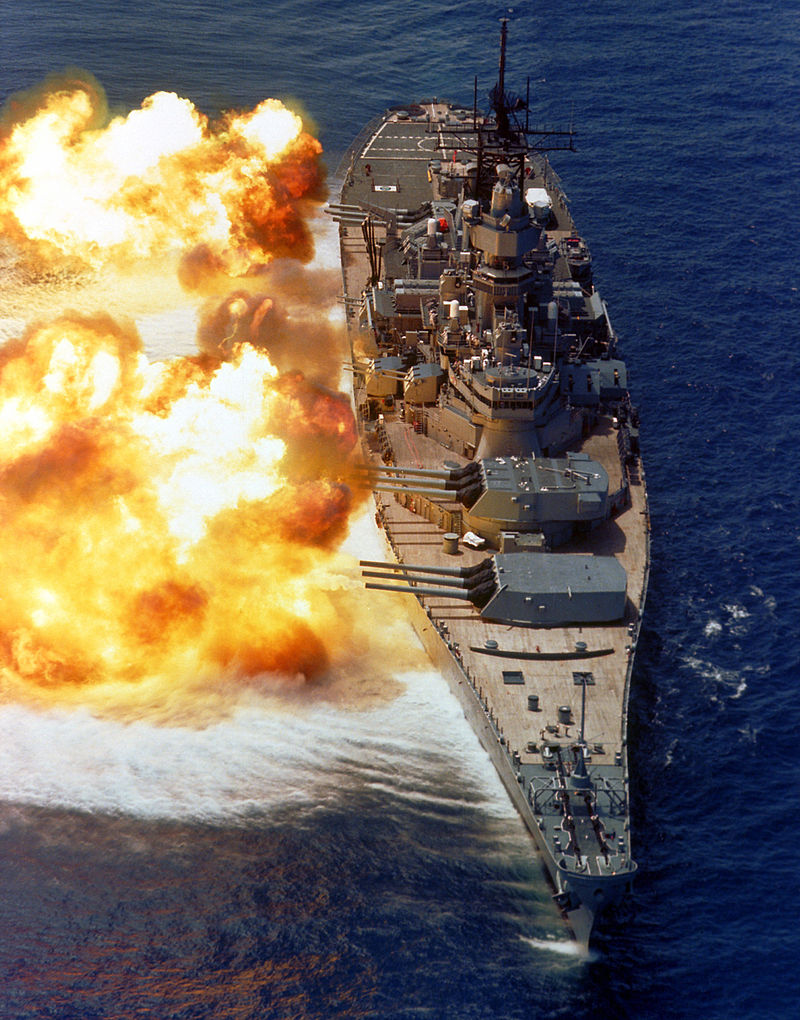
Battleship – Hulking and mighty, a battleship is characterized by excessive firepower, mainly in the form of huge cannons. Because of the enormity of their weaponry, battleships often lack the ability to tackle the smaller problems without it being an annoyance, while they are wonderfully adept at destroying the larger, slower moving vessels.
Extended battleship titles are given to battleships which fit their role extremely well, or fit some other modified role. These include: dreadnought [extremely large cannons; most battleships can interchangably be deemed dreadnoughts], super-dreadnoughts [can the cannons get any bigger?], and fast battleships [big cannons AND big engines!]
U.S.S. Boxer, a Wasp Class Amphibious Assault Ship / Helicopter Carrier
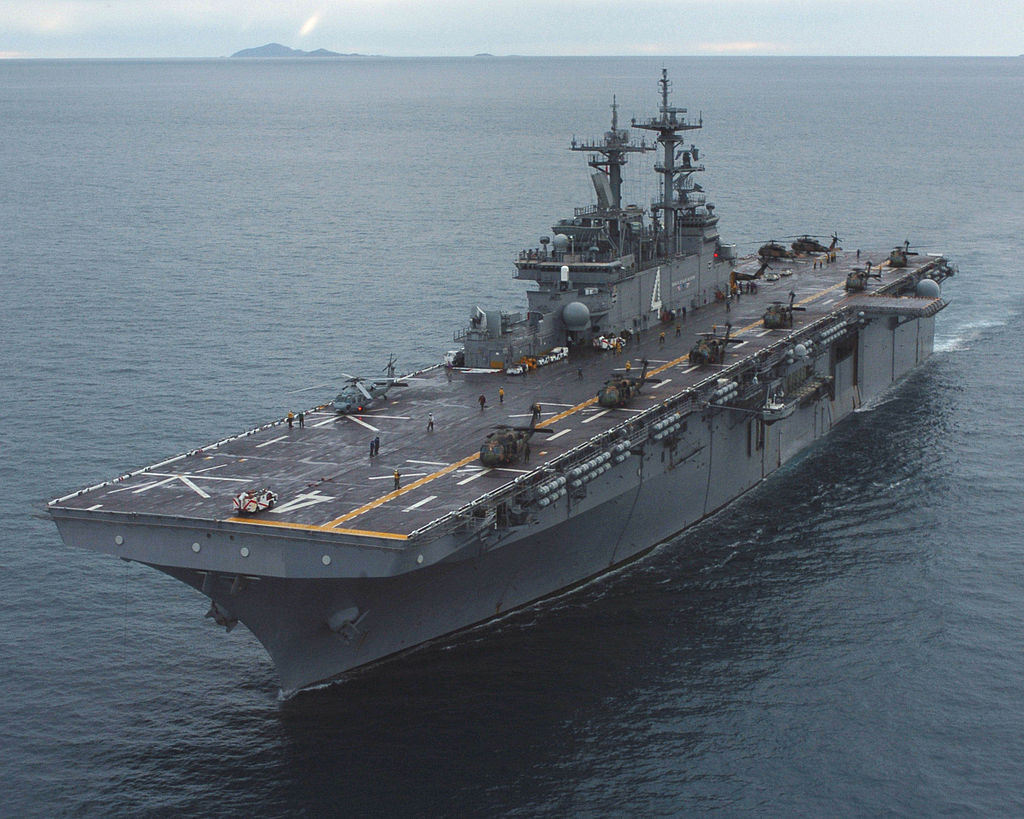
Carrier – Characterized by its ability to carry and deploy subvehicles (AI or player-controlled constructs), carriers act as waterborne hornet nests, deploying intimidating aircraft or naval vessels to accomplish its task. A carrier’s main strength is that it can remain out of harm’s way in the face of, say, a battleship, which would otherwise make for a terrifying adversary, by deploying its subvehicles and allowing them to do the up-close damage.
Swedish Visby-Class Stealth Corvette
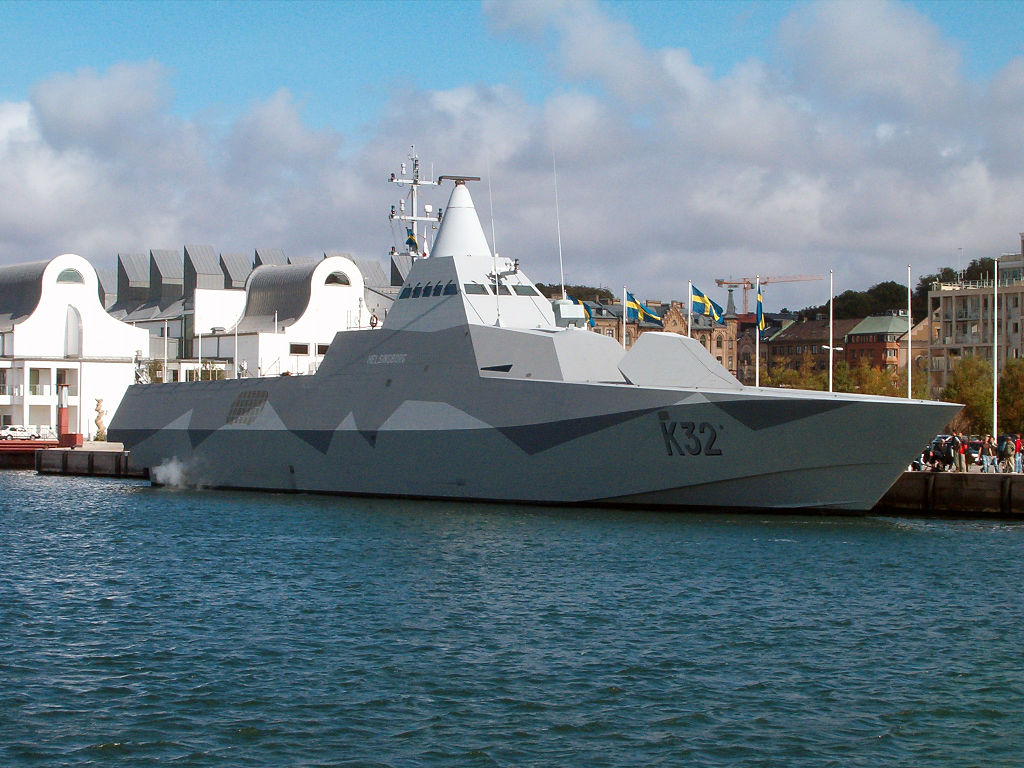
Corvette – Extremely small and quick, corvettes typically serve as reconnaissance-scouts or reconnaissance-vanguards, but also may serve as combat support. Because of their size and light armor, corvettes often lend themselves to these purposes, including deploying depth charges to destroy submarines or laying mines to prevent hostile movement.

Cruiser – The mid-ground between a destroyer and a battleship, a cruiser serves as a self-sufficient all-rounder, capable of tackling both small and large, slow and fast ships. Their weakness lies within their jack-of-all-trades, ace-of-none nature, though in a smaller or solo fleet, a cruiser may be the best option when resources are limited. Specialty cruisers exist to serve more specific roles and abandon some of their all-roundedness: missile cruisers, battlecruisers, and light cruisers, namely.
U.S.S. Winston S. Churchill, an Arleigh Burke-Class Guided Missile Destroyer
The antithesis of a battleship – fast, nimble, and usually lightly armored. Destroyers, while not capable of the consistent onslaught that a cruiser or battleship might offer, are effective in close-range, fast-paced attacks, serving to a fleet the same shock-troop purpose cavalry served to the antique military. They also may specalize, as strange as it sounds, in destroying other[/b] destroyers, preventing and countering a close-range attack via short-range torpedoes, mines, or other devestating short-range attacks.
HNLMS Eversten, a Dutch De Zeven Provinciën-Class Frigate
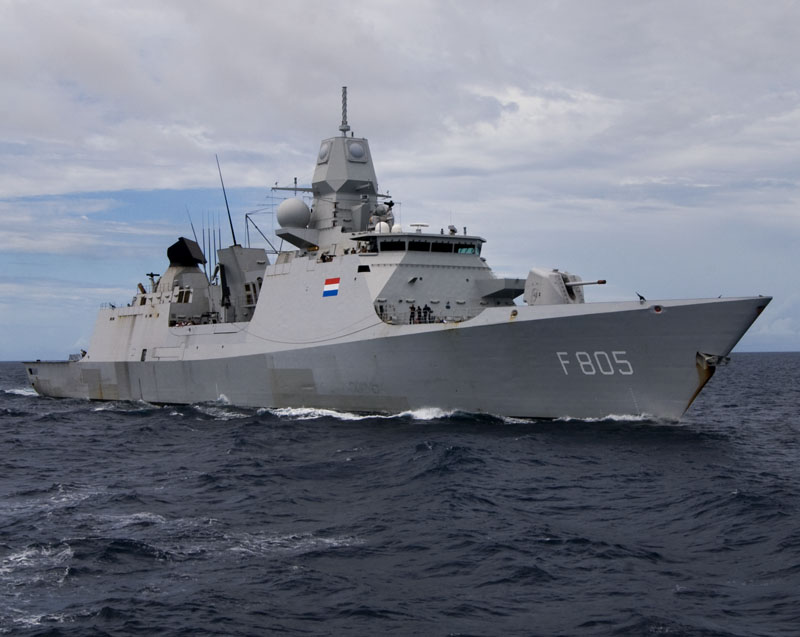
Frigate – A step above a corvette in terms of size and firepower, frigates often serve as escorts that bring utility ships closer to the main fleet. In the earlier stages of a campaign, most new players strive to have a frigate spearhead their fleet.
United Kingdom Severn-Class Lifeboat
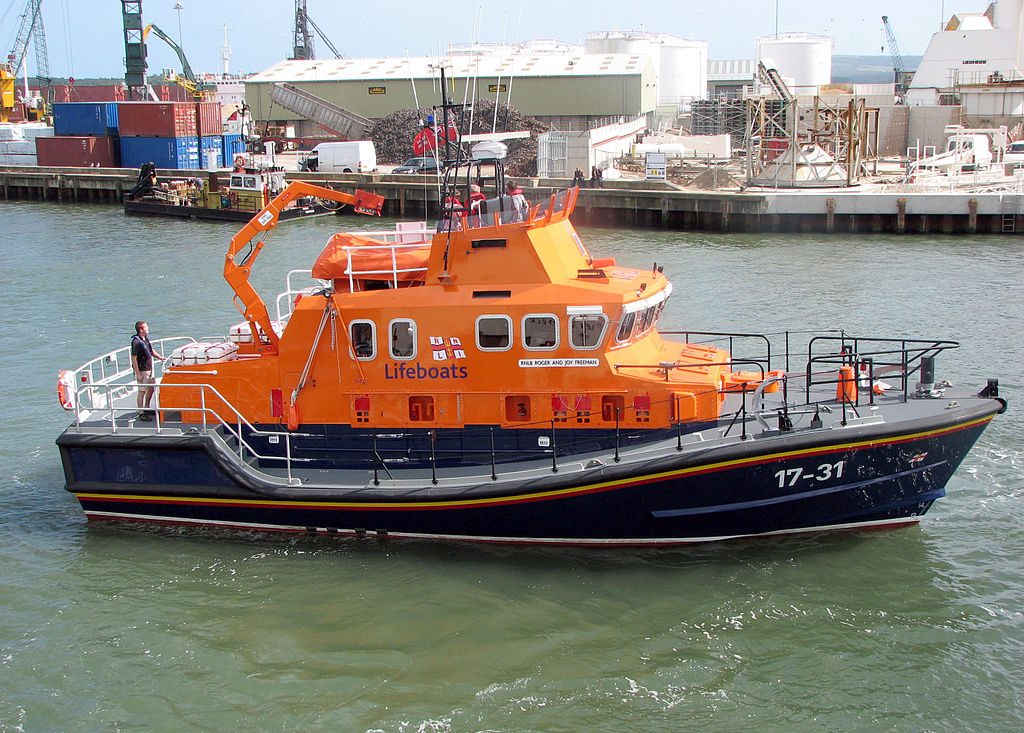
Boat – Too small to fit into even the corvette type, a boat is usually a wooden vessel comparable to the starting vessel in the campaign. The well-read will seldom consider a boat to be a type of ship, but how much more specific do I need to be? We classify, for the sake of this guide, a boat to be a very small ship.
Deepwater Guard Paddlegun-Class Battlecruiser
The class of a ship is usually the name given to the ship’s hull type.
The Deepwater Guard’s “Paddlegun”, due to its formidable defenses, heavy cannon armaments, and missile capabilities, is best classified by the type Battlecruiser. If one were to produce multiple of these ships, you could name them, say, “Harbinger”, “Peacekeeper”, and “Clyde”, all of which are Paddlegun-Class Battlecruisers. Sometimes, slight ship modifcations are made between different named ships of the same class. The U.S.S. Missouri, for example, is an Iowa-Class battleship, which bears an obvious resemblance to the U.S.S. Iowa, but has been modified with improved top-deck armor, protected ammo caches, and slightly improved armaments.
Does any of this teach you how to actually build a ship? No. But with a better understanding, you might find yourself more immersed in what you’re eventually going to do [if this damned guide ever gets to the important stuff!]. It does sound cool to be able to upgrade from saying, “I’m going to build a big boat with huge cannons, but also have it be pretty fast”, to saying “I’m going to build a fast battlecruiser.” A little quicker, too.
Hull Concepts and Staying Afloat
DISCLAIMER – This guide assumes you’ve already become acquainted with the controls of the game. If not, starting up the vehicle designer will provide some basic directions on the lefthand side of your screen. Other tutorials for this sort of thing exist as well.
Building Materials
The most basic thing that literally and figuratively holds a ship together is its hull. The hull must, in most cases, be comprised of a buyoant [that is, on a single block-by-block basis, capable of floating in water on its own] material such as wood or lightweight metal alloy. Constructing a boat completely of metal requires an extensive use of water-tight air compartments within the hull of the ship, which limits carrying capacity, and means that any holes in the ship will easily aid in its sinking. To put it briefly:
- Wood is vulnerable to pretty much everything, floats well and is dirt cheap. It makes up a majority of beginner ships as well as the internals or decks of some larger ships.
- Stone is for structures. The clever among us will recognize that stone can serve as a cheap alternative to lead, filling the same niche as for keeling, but behaving a bit differently underwater due to differences in density.
- Metal is highly durable, is a midground of cost between wood and lightweight metal alloy, and sinks on its own. Guess what you should armor plate your ships with?*
- Lightweight Metal Alloy is a midground of armor and health between wood and metal, but is lighter than wood, and more expensive than metal. In later stages of the game, it is often used as the main building block of larger ships destined to carry hilarious amounts of weaponry and equipment.
- Glass is, big surprise, a transparent, extremely vulnerable material. Use it for windows when you want closed, secured control platforms. Technically speaking, it is lighter than lightweight metal alloy. You could, if you dare, create a literal glass cannon. Hilariously, the glass cannon hull would be light enough to support a huge armament, as the name implies.
- Lead is hardy but easy to penetrate with anything above your typical cannonball. It should never be used for armor because it is more expensive, heavier, and less durable than metal. It’s main [arguably only] function is to serve as keeling for a ship that needs it.
*Rhetorical question: metal, thick walls of wood, and lightweight metal alloy can all serve as good armor in certain situations.
Designing a Basic Hull
For the first ship, we will take the starting raft and warp it to our selfish desires. But first, let’s examine the basic principles at work here.
The bow and stern of the ship are the front and back, respectively. Port and starboard are the left and right of the ship, respectively. These directions are determined by the path of forward motion of the boat.
Underneath a ship, one will often find a keel, which is a heavy weight, usually lead, that exists to keep the ship oriented the proper direction. Despite how crazy and absurd the game can get at times [take one look at a DWG Paddlegun or their Atlas Airship, and tell me you’ve never dreamed of such insanity as a child], there is some very real math at work here.
Pressing “\” will display force visualization; that is, all forces, be them thrust or gravity, will be displayed. For the time being, all we see is a pinpoint that displays the center of mass [C.O.M.], which cleanly divides the wooden top deck from its lead keel on the starter raft. Please note that the COM does not imply that everything above it will float above water and everything below it will float below water; a block of lead has a COM in its dead center, but it by itself certainly does not float. There are two main reasons we look at the COM:
1. Capsizing – Capsizing is when a ship flips over and goes “belly up.” This is caused by the center of mass being too high on the ship. In simpler terms, the top is heavier than the bottom, and so the top and bottom want to switch places. This commonly happens with new players excited to install a huge cannon on their little frigate, only to discover that the cannon seems to work much better as a substitute keel.
If we overload the top of the raft with lead, we see that this lead pillar shifts the center of mass dramatically upward, meaning that when it hits the water, it’s going to capsize with ease. If we simply flip the original design of the starting raft over, declaring the lead block to be the desired “top” of the boat, we see that it doesn’t capsize, and the COM is perfectly between the two rows of blocks. Due to this strange balancing act, though, if forces acted upon the raft such that the raft were to capsize, it would be perfectly happy in its original configuration with the lead block on the bottom of the ship. Adding a second lead block to the original configuration makes for a heavier keel, that being the weight deliberately placed on the lower half of the COM of the ship to prevent it from capsizing, usually lead.
2. Flipping or diving – We define this to be a little bit different than capsizing. Flipping occurs when the center of mass is pushed to the back of the boat or when the center of thrust is below the center of mass, causing the bow of the boat to shoot up into the sky. Diving [unintentional, not to be confused with the intentional diving of submarines] occurs when the center of mass is pushed to the front of the boat or when the center of thrust is above the center of mass. Any of these imbalances can, in the calmest cases, result in a little instability or reduce top speed due to unnecessary torque placed on the vessel. In the most extreme cases, having imbalances in the centers of thrust and mass can have your boat attempting to plummet to the depths of the ocean, soar to the skies like the Flying Dutchman itself, or spin around in circles endlessly.
A properly balanced hull – notice the center of mass not being too far forward nor too far backward, nor to either side. Notice also that the center of thrust [coming from the single propeller] is placed inline with the center of mass. Also notice the centrality of both the rudder and the propeller.
ON THE LEFT – the center of thrust is placed off-center, meaning that when the propeller pushes the ship forward, it will also turn the ship to the right. ON THE RIGHT – the center of mass is too far back, meaning that when the propeller pushes the ship forward, the front of the ship will arc upward.
Ensuring that propulsion systems and the COM are properly aligned is, as you can imagine, critically important, especially on larger or faster ships. Do not attempt to toy around with keeling and weighing things down until the ship is fully finished; the addition of engines, guns, etc. will all contribute to the final mass of the ship.
Buoyancy Systems
Buoyancy Systems & Preventing the Ship from Rolling
There are three major ways in which ships stay afloat and uncapsized. The first and most obvious of these ways is to construct the ship out of mostly buoyant material, except for the keel of course. This will be especially important once non-buoyant things like cannons and armor are added.
It’s no surprise how this “ship” will be balanced in the water.
Air and Compartments
The second way is the utilization of air pockets within the ship, usually up on higher levels so as to not counteract the purpose of the keel and to further prevent capsizing. Using the water pump device in the Water section of the vehicle designer pumps out water in all air spaces connected to it, adding this incredibly buoyant effect. Just make sure it’s water-tight!
It’s also a good idea to section off the hull of the ship (you can see this sectioning-off represented by the glass dividers between the chambers). This will slightly reduce the total amount of cubic meters made buoyant by the water pumps in each chamber, but will protect you from a ship-wide flooding catastrophe if a single hole in the hull were to be placed. If one compartment floods, in this way, there is always another to take its place while you make your repairs.
Nifty little cross-section picture just for fun!
Additionally, it is worth noting that buyonacy hulls that are above the waterline will not do anything. Think of it like a lifevest; when you are out of the water, it doesn’t do anything. It doesn’t make you feel lighter. When you’re waist-deep in the water and the vest still isn’t submerged, it still isn’t doing anything. Only when the vest finally touches the water does its buyoant factor become important. Thus, buoyancy hulls that are placed above the waterline will not help keep the ship afloat; however, if the ship begins to sink, those buyoancy hulls that now begin to touch the waterline will now do their job and potentially keep the ship from sinking.
Pontoons
The third way to prevent critical vessel failure is to affix pontoons onto the ship. Pontoons are usually found on smaller rafts like canoes, and serve as lateral projects from the main ship hull, composed of a light material and / or filled with air. They prevent lateral rollover on sharp turns, capsizing, and sinking in general.
They’re often not pretty, especially on a smaller ship as From the Depths lacks small enough parts to sculpt it nicely. Additionally, smaller ships which would more readily accept a pontoon find it hardest to install them, as it is difficult to make a sturdy structure that contains a water pump (or even just the sturdy wooden structure itself).
Many other ways exist to help keep ships afloat, which should come as no surprise, as keeping the ship where it should be is the most important part. These are three of the most common and effective ways.Propulsion Techniques: PropellersThere are two main types of propulsion techniques that this guide will briefly examine: propellers and sails. You should be made aware that there are other types of propulsion as well; jet engines and paddles in particular can make for extremely fast ships, though we are only looking to cover the basic, conventional forms here, which still, of course, all can prove very useful.
Important Note: You would be at a tremendous loss to not do the two Deepwater Guard storyline missions, as they unlock the Huge Propeller and Square Sail parts, which are incredibly helpful in creating larger, faster ships. They are both do-able with the vehicles they provide you.
Powered by your choice of engine, propellers are a consistent, simple system that are the go-to propulsion type for most ships.
Advantages: Creates potential for extremely fast ships; is difficult for enemies to disable, especially on larger ships where the propellers are deeper down and harder to see; consistent, reliable power.
Disadvantages: Requires proper balancing with the center of mass; requires fuel and an engine, which both weigh down the ship and create more liabilities within your hull.
Building a Propeller-Driven Ship
As you probably could have guessed, building a propeller-driven ship isn’t the easiest thing in the world. Most problems arise in balancing and counterbalancing weight, as well as designing a hull that is destined for good balance. For example, in the pictured ship above (a 3rd Series Hunter-Class Corvette), a goal was proposed such that the boat would be resistant to torpedo fire, which meant that not only did the ship have to bear a small, thin underwater profile, but the important parts of the ship (ammo and fuel caches, the engine room, etc) had to placed high up near the top deck so that underwater attacks would not damage critical parts (save, of course, the propellers). In doing so, the top-heavy ship needed intricate keel work and precision balancing to allow it to pass all maneuverability stress tests.
Comparing the Centers of Forward-Backward Thrust and Mass
Proper balancing is important. As mentioned before, the Hunter-Class Corvette suffers from a top-heaviness issue which, while resolved by the extensive keel-work on the bow and stern, still leaves for thrust dilemmas. Most notably, observe how the lower main propeller is considerably below the true center of mass, even when including the front keel. Nonetheless, the ship floats just fine, reaching a (stable) top speed of 16.0m/s. This is an example of where it is far too easy to overthink a simple design; if you simply read this guide and followed instructions for thrust and mass placement to the detail, you might’ve spent hours slaving over how to balance the lower main propeller, when in practice, the ship works as it should anyway. Always be certain to test-drive your ship even when you know it isn’t balanced or finished. It will help you understand the forces at work on your ship and also perhaps save you from painstaking hours of needless balancing.
Comparing the Centers of Lateral Thrust and Mass
Lateral propeller balancing works a little differently than main propeller balancing. In order to achieve proper side-to-side balance with the center of mass, it is assumed that you mirror whatever propellers you place on one side of the ship to the other. This becomes trick when designing assymetric ships; just know that improper or strange lateral propeller placement does far less harm than improper main propeller placement, so feel free to do whatever strange things help your ship move.
Notice how the upper lateral propeller (Huge Propeller that appears to be toward the front of the ship) is placed directly in-line both vertically and horizontally with the center of mass when looking at it stern-to-bow. Due to the mirroring of this propeller on the other side, this lateral thrust system is also inherently port-to-starboard in-line. This means that, on its own, in theory, these propellers will simply push the ship to the left or right without changing its direction. What this means for the ship when it combines it with forward thrust is that turns will be extremely efficient and produce little-to-no rolling effect.
The lower lateral propellers complement the lower main propeller; just as was the case with the lower main propeller, these propellers are theoretically placed in a strange place. However, test-driving the ship will demonstrate that these propellers help keep the ship under control during turns and produce little rolling effect. Additionally, placement any further up tended to have the propellers exposed out of the water, so they were nestled in wherever they would do the most work.
The Rudder
Of course, the rudder should be as far back and as central as possible, but what about having multiple rudders? So long as the rudders are placed with identical distance between them and the center of mass, they will behave in much the same way as a single rudder does. Some ships (especially larger ones) enjoy multiple rudders due to the enhanced control over turns they offer. Be advised, though, that if one of the side-placed rudders gets destroyed, you will be experienced very strange maneuver behavior.
Most ships of larger size also sport larger rudders, though currently, no such part exists in From the Depths. To substitute this effect on larger ships, most players complement their rudder with large lateral propeller systems. The desired effect is thereby easily achieved. Technically speaking, Hydrofoils placed vertically (such that their “up” and “down” controls actually act “left” and “right”) achieve a large rudder effect, but the effect isn’t as simple to achieve as simply using propellers and regular rudders.Propulsion Techniques: SailsIf the ship is to be very small or lightweight, a sail may be your best option.
Advantages: Doesn’t require the same attention to detail as proper propeller or paddle placement does; far more practical on a ship whose hull structure doesn’t lend itself to a big engine being stuffed inside it; can allow light ships to go very fast; doesn’t require fuel, which means there’s one less “explode-everything-on-the-ship” chamber in your hull.
Disadvantages: Fragile – one stray cannon shell to the mast and the entire superstructure comes crashing down; subject to the whims of the wind; not as fast or reliable as propellers or paddles in some instances.
Sailing With the Wind
Despite their simplistic structure, sailing vessels in From the Depths can be difficult to get right. Most important to most sailing vessels is the presence of a mainsail, which runs along the length of the ship, catching crosswinds to translate it into forward movement. The presence of the square-rigged main mast helps magnify this effect, but can be harmful when sailing directly into wind. Notice that, as we sail with the wind, our job is rather simple; keep the main mast aligned as best as we can with the wind and sail in our preferred direction. Placing the entire mast on a spin block structure allows us to control how much energy we collect from the wind without having to turn the ship, meaning we can travel in directions somewhat close to the direction of the wind and still receive a great deal of forward thrust. The mainsail helps catch crosswinds and translate this into forward thrust as well (you can see the three green arrows representing forward thrust). When the mast structure is perfectly aligned with the wind, we notice that the mainsail doesn’t produce much a wind or thrust vector.
Sailing Against the Wind
The true challenge in sailing comes with the attempt to sail against the wind instead of with it. There is an obvious difficulty in this; the main mast will be of no help and actually propel the ship backward into the wind. At full sails, it is nearly impossible to get the ship to align against the wind. Lowering the sails to a certain (perhaps full) extent is required.
While the total thrust produced by the main mast overpowers the work done by the mainsail, we notice an incredible and integral aspect of sailing – headsails. These sails catch wind against the grain and translate it into forward thrust.
Unfortunately, there is currently no way to control which sails you raise and lower individually. This means that you have to be careful with how large you make your masts and sails. With an incorrectly designed sail, it could be downright impossible to sail against the wind. Hopefully, there is work being done to negotiate this issue, but in the meantime, the above picture offers two solutions.Your First ShipIn From the Depths, you can either believe that form follows function, or that function follows form. Both are true in many cases, but it’s up to you to decide which line of thinking you want to follow.
In order to compare the two, we’re going to create a ship with a few simple parameters, and see how the design and final form might change depending upon how you approach the problem. The conditions are as follows:
- The ship must pass all four of the basic conditions for being a ship outlined in the first section.
- The ship must use a diesel engine with a maximum power output rating of at least 30.
- The ship must be capable of a top speed of 4.0m/s.
- The ship must take on and defeat a Deepwater Guard Sea Viper in pitched combat.
- The ship must cost no more than 15,000 RP.
In effect, what we will be left with is a decent starting ship capable of taking on some early Deepwater Guard threats.
Designing the Hull
Until you are familiar with how ship components should sit within your hull, it is usually easier to design the necessary components first and then covering everything up with your fancy hull once you know the ship, functionally speaking, is complete. This has the benefit of ensuring your ship has its necessary parts and resources while also giving some meaning and engineer’s logic behind, for example, the aesthetically-wrapped armor plating you chose to install on the stern of the ship.
In any event, let’s begin.
Given what’s being asked of the ship, we aren’t going to need something very large. Sea Vipers are armed with a few Large Cannons, but nothing much more intimidating. On a small ship, however, it becomes especially important to properly place the delicate internals, as there is less armor to protect these parts. As such, we’ll be entertaining a simple engine design that pumps out about 33 units of power. Each Small Propeller will use 5 units of power at its peak usage, so this is more than enough.
Since this is a small ship, we’re going to completely close off the engine room from the rest of the ship. Localizing its armor prevents damage to the rest of the ship from harming the engine itself. Completely sealing it off, we’ll begin adding an ammo cache to the front of the boat. Again, we’re going to give the ammo cache its own separate compartment, mainly to prevent an explosion in this chamber from damaging the rest of the ship. While not perfect, the armor will prevent a detonation from most shots from damaging the engine.
After sealing off the ammo cache, we’ll add the buoyancy deck to the ship. Most ships don’t necessarily need a buyoancy deck (especially those made of wood), but it has the effect of keeping the top deck of the ship off of the water, which makes it easier to aim weapons. This higher profile, however, does make the ship an easier target, but we’ll manage. You’ll have to constantly weigh these advantages and disadvantages.
Adding the top deck, ship’s wheel, chair, rudder, and main propellers, we now technically have a functional ship. It’s worth dropping it in the water before doing anything else just to see how it rests.
Horrible. The center of mass seems a bit high, so while the ship seems to stay right-side up as we’d expect, it’s not far off from capsizing. We’ll have to add a lead keel and see how the ship handles then.
The lead keel evenly distributes bottomweight across the ship, and the buoyancy deck prevents the ship from sinking much further into the water. One problem though: we can see that the propellers we initially placed are a bit higher than the center of mass. This means that when they’re used, it’ll not only push the boat’s bow down into the water (as pictured above), but on this small ship, the propellers are too high up anyway and are kicking out of the water, providing inconsistent thrust. Since the engine has a maximum power output of 33 and we don’t plan on adding any other power-demanding systems to this ship, we’ll simply add 3 more Small Propellers to in a row beneath the existing ones. This will double the thrust, but more importantly, provide consistent thrust, as it is unlikely that these propellers will ever raise above sea level.
Much better. It isn’t required, but to improve handling, we’ll add a small weight to the bow of the ship. This counterweight improves handling in rough waters; as you’ll notice if you try to pilot this ship yourself, it is very open to the whims of the waves, as most small ships are. Only so much of this can be controlled for; too much keeling will slow the ship down but add control in waves; too little keeling will risk a capsize, or keep the propellers skipping out of the water.
Now time to name the ship and test it in open combat against the Sea Viper!
Bow-to-stern, the ship is 16m long (with a 4m extension for the rudder), and is 5m wide. It reaches top speeds of about 5m/s (7m/s in lucky waves). It has four main armaments in the form of four Small Cannons, which do decent close-range damage. It’s up to you what you call the ship. We’ll call this little guy “Explorer”, a Boat type of the class Lancer.
Ah, the Sea Viper always finds a way to capsize. Two minutes into the fight, enough damage was sustained by the Sea Viper to create this wonderful attack opportunity. After a couple of minutes more of constant barrage fire, we secured victory. Let’s analyze how the Explorer held up:
- Well-armored engine room and ammunition cache. Very little main hull penetration.
- Typical speed, but wonderful turn radius that makes for easy broadside attacks (which we took advantage of when concerning ourselves with placing side-facing cannons).
- The rudder structure is susceptible to a quick decapitation from a stray cannonball. It doesn’t take long to repair due to the simplicity of the parts, but nonetheless, it could make for a big problem in the heat of battle.
- As is the case with most small ships, has difficulty handling itself in rough waters, and tends to pitch its bow upward during top speed travel.
It is important to be able to know the strengths and weaknesses of your designs so that you can improve. Don’t lie to yourself in believing that a failed model works, and don’t be upset if an ugly design works well. There are things to be learned from every situation.Aesthetics – Putting a Front and Back on Your ShipBuilding a functional ship will eventually become relatively straightforward (unless you impose your own challenges, such as building a ship that has at maximum XYZ dimensions, building a ship that costs less than 10000 total resources, etc.). We’ll take a look at the demonstration vessel we used in the Buoyancy Systems section to see if we can’t polish it up.
Fronting and Backing Your Ship
Often times, the most confusing and frustrating parts of the ship to make look attractive are the bow and stern. Most ships, even modern ones, are characterized by a slightly-to-much longer bow that thins out and is designed to cut the water. More modern ships tend to simplify their sterns with flat backs, but some older warships, especially wooden ones, have very well-crafted, rounded designs.
Please note: This is not the only aesthetic way to front or back a ship; each ship might look nicer or worse depending on how you front and back it. Some more aggressive, long-sloping designs may look ridiculous on a small vessel, while some flatter ones may look chubby on a large ship.
For your viewing convenience, the bow of the ship is colored white, while the stern is colored black.
The Front
Keep in mind that, if you’re going for a realistic look, the front of the ship is designed to cut through the water efficiently, meaning there is a narrow front profile with some type of slope approaching the waterline. The actual steepness of this slope can vary tremendously; some ships cut through the water with a straight up-and-down bow, others have a very flat nose that skims across the surface of the water.
Starting with some sloped wooden blocks, we fill out the bow of the ship layer-by-layer. Please bear in mind that it’s much better to leave the bow-piece hollowed out; you never know what extra things you may want to stuff in this new extension to the ship.
Now we just keep adding layers; rinse and repeat. There are a variety of ways to approach this; it could either gradually increase in slope or decrease in slope depending on the look you want for the ship. A consistent slope is easier to design, has more total volume, and can look better on certain types of ships (futuristic ships especially). It all depends on you, the “engineer”!
The Back
The back’s design varies in real ships far more than the front does; while the front is designed to cut through the water efficiently, the back can be as narrow as the front or as wide as the body of the ship depending on your tastes. Slower moving, less agile ships often have wider, curving backs such that they could place rear-facing cannons or strategic viewing rooms on the stern, for example.
On this ship, we wanted to provide a shallow, rounded-off stern to give it an old-time frigate feel.
This demonstration vessel was particularly narrow, so we didn’t have much width to make a fascinating curve with. Nonetheless, we’re now left with a decent looking front and back for our ship.
Dydrodynamics – Drag, And the Centers of Thrust and Mass
Centers of Mass and Thrust
Forgive me: In this section’s diagrams, the words “weight” and “mass” are used interchangeably. For our purposes, we are technically interested in observing mass, as weight has more direct implications with gravity, which is something we don’t concern ourselves with here (assuming your ship isn’t denser than water!) Weight has been improperly mentioned at certain times. I apologize in advance, though I do believe most, if not all, will be able to see past these inaccuracies.
Hydrodynamics is something From the Depths players are painfully familiar with. It’s something we’ve been talking about all along, but would like to formalize it here. Let’s look at an example ship to quickly brush up on some concepts we spoke of in the Propellers section.
We know from previous discussion that the center of mass and center of thrust need to be in proper balance. Can we look at a more clear, perhaps less From-The-Depths-y, more abstract-y diagram, to get a clearer picture? Of course we can.
This serves as a good review of some of the things already talked about, but also introduces some other very important concepts. It is also serves as a go-to diagram to help you troubleshoot some basic, yet persistent, hydrodynamics issues.
What is new and perhaps most important to take from this diagram is the concept of drag. Drag is a force that acts opposite to the relative motion of an object moving through a fluid. Basically, it’s what slows a flat-faced ship down but helps a pointy one glide through the water. Let’s look at two different cases where we put our example ship to some speed trials to see how much drag truly effects us.
Scenario 1: Small Drag Arms
In this case, we see that there is a 7.27% decrease in top speed when we introduce this new horrendous drag surface. What happens if we make the drag surface even more dramatic?
Scenario 2: Large Drag Arms
Please bear in mind: this is the same amount of wood as used in the previous example, meaning the mass doesn’t change, only the total area of the drag surface.
Comparing the two side-by-side sheds even more light. The second scenario slows the ship’s top speed down by about 25.45%, holding mass of the ship constant between the two experiments. A fun experiment to try at home: see how orienting these same 15 blocks on each side in different ways produces different, sometimes wider, sometimes thinner, drag surfaces, and how each of them handle in the water. A few spoilers of the experiments you can try:
Scenario 1 has the most mild of the effects; turns are slower, the ship leans in the water slightly less on turns, and the ship is slightly slower overall. However, it also does not pitch up and down in the water at high speeds as much, as the top-down drag continually acts against the ship trying to bob up and down in the water.
Scenario 2 has extreme slow-down effects on both turns and top speed, and the ship leans in the water much less, but it doesn’t very much affect nose-pitch orientation in the water (that is, if the nose of this ship is prone to pointing up out of the water, this design didn’t do much to stop that).
We can relate this back to our discussion on pontoons: while they add great stability and can keep even the strangest ships from losing their balance, they come at the cost of adding drag.
In general, ships (as you intuitively probably know) are designed to be streamlined so that they can sail easily through the water. A well-streamlined, 20,000RP wooden Galleon will require much less total thrust (and therefore, less fuel or less sails) to glide through the water than a flat-faced wooden cube of comparable RP, which would require tremendous amounts of thrust to push it through the water at the same speed as the Galleon.
Even ships that aren’t designed for high speeds are typically streamlined since, as stated above, no matter how fast the ship is destined to go, requiring less energy to “go” is always a good thing. Keep the total forward area which is exposed to water at a minimum to ensure the highest possible speed.